It's been 4 years, 4 months, and a few days that the crib I bought for my first born child was first used. It had stayed in the same room, in the same place the whole time. The only thing changing was the children. Once number two was coming the boy moved to the other bedroom in the house and got his own big boy bed right off the bat. He was getting a little too big for the crib anyway, so we skipped the whole toddler bed thing with him. But for the girl, well, she is growing, but she is still little and I just don't want to get her into a twin size bed just yet.
I am taking the crib to my parents house to give to a family friend who is expecting her first baby in December. That way I don't have to discard it or store it. Perfect solution.
When I think about not having a crib in the house any more it reminds me that my children are growing. Fast. They are no longer babies. There will be no more babies in the house until one day, a very long time from now, when we might be blessed with grandchildren. The sadness of this realization only stays for a little bit because I am totally excited about the girl's new big girl toddler bed! I can't wait to makeover her room more and make it more toddler/preshooler friendly and less babyish.
Because I am loving me some Pinterest, this is not an original idea by me. I found this
pallet toddler bed on Pinterest (links back to the original source with tutorial at her new website). Thanks Lori Danelle for sharing this project.
Go ahead and check out the link...I'll wait. Really.
Ok.
Isn't it cute?
I love it.
I want my girl to have one.
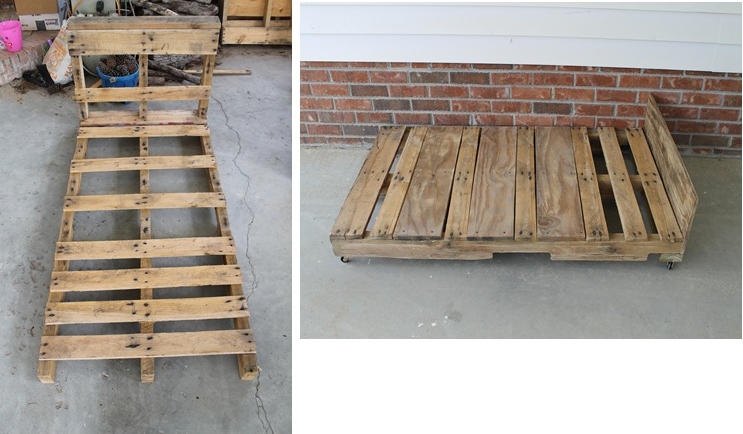
I brought home some pallets from work; brand new, no age, used only once. I found this long one and knew it would be perfect for the base of the new bed. No piecing together!
I had removed a few of the slats that were split. This pallet was way too long for a toddler bed, so I measured how far down I wanted the mattress to go including a headboard and cut the bottom part off. It got used for the headboard. Nothing wasted.
The first picture shows the premise of the finished product. By the time my complete idea had been formed the frame was still a little too long and the headboard was a little taller than I wanted it to be. No problem. I had a friend from work stop by the house and cut new slats for me from plywood, even out the bottom of the pallet, cut the footboard shorter, and shorten the headboard.
The second picture shows the frame completely put together. The new slats were added. The footboard was already the size I wanted it but a bit too long. So he cut that for me as well, and the 2x4 to hold the casters at the end for the bottom. The footboard sits on top of the 2x4 so that it would be higher at the end. I attached four small casters to make moving easier, and I am so grateful I did. It was much easier to push around the carport and the bedroom once I moved it inside.
What it will look like when it is all said and done. Cute.
I needed to drill holes for the brackets to hold on the headboard and then move it into the house for final assembly. It required some cleaning and moving of things to make room for the new bed and the crib. The crib does not fit through the door.
Before:
The crib and a messy room. The crib converted to a toddler bed so she could get used to it first before I got her a new one. Although it was time for the crib to go, it's kind of sad, too. Stop growing children! Time to cleanup and make room for the new bed!
I cleared out the same spot that the crib was in for the new bed. I attached the brackets to the frame and the headboard. All was ready to move into place and fixed up.
After:
Looking good already.
All made up. Almost. Oops, forgot the pillow.
There, all ready for the big girl to sleep on it. Once I finished taking pictures I realized I needed to wash the comforter so I put her ABC quilt on it instead.
Now it is ready for my growing baby girl. This particular bed is really, really low to the ground. But that is ok, she sort of had to climb into her crib/toddler bed. And when/if she falls out of bed she won't have as far to go. She did fall out of the previous bed a couple of times. Since it is so low there is no room for under the bed storage. I guess if I needed to I could attach some posts under the frame to make it taller, but by the time that would happen she'll be ready for a twin bed.
It's weird walking into her room and feeling like it is more open. The crib had some height to it so when you walked in you noticed it even if you weren't going to the crib. The tallness of the crib is no longer there so that whole space feels so open now. Since the bed is much shorter than the crib it feels like you have walked into a room for an elf, everything is miniature.
When she walked into the room she gasped a little and said, "Ohh". I think she liked it. The real test would come at bedtime and if she would sleep in it. She's a good sleeper and adapts to change pretty well.
And we have a winner! She has been enjoying her new big girl bed so much that she wants me to come into her room to look at it. "Come on, Mommy. Come, on." She'll take me by the hand and lead me to her room and want to play.
I hope she never outgrows it. *sigh*
Total cost for this toddler bed...under $12.
The brackets were $7, and the casters were just over $2 per two-pack, so a little over $4 for all four. I had bought some plywood to use for the new slats but I ended up not using that plywood. Everything else was stuff we already had on hand.
Once she has outgrown it I may re-purpose it for my craft room, or in put it in the yard for more enjoyment. Either way it will have a long and useful life at our house.


.jpg)


.jpg)


.jpg)


.jpg)